
Flutter를 활용한 어플 개발은 UI 컴포넌트 생성, 데이터 모델링, 화면 간 이동 및 상태 관리를 포함한 여러 단계를 거칩니다.
이번 글에서는 기본적인 Flutter 개념과 함께 간단한 당근마켓 UI 구현 과정을 따라가 보겠습니다.
1단계: Flutter 프로젝트 설정 및 테마 구성
프로젝트 생성
Flutter CLI로 프로젝트를 생성하고, 필요한 패키지를 추가합니다.
flutter create carrot_market_ui
cd carrot_market_ui
flutter pub add google_fonts intl- google_fonts: 구글 폰트를 활용해 텍스트 스타일을 꾸밈.
- intl: 숫자 포맷, 날짜 처리를 지원.
테마 파일 작성
Flutter 앱의 스타일을 통일하기 위해 테마 설정을 추가합니다.
theme.dart
import 'package:flutter/material.dart';
import 'package:google_fonts/google_fonts.dart';

// 텍스트 테마
TextTheme textTheme() {
  return TextTheme(
    displayLarge: GoogleFonts.openSans(fontSize: 18.0, color: Colors.black),
    displayMedium: GoogleFonts.openSans(fontSize: 16.0, fontWeight: FontWeight.bold, color: Colors.black),
    bodyLarge: GoogleFonts.openSans(fontSize: 16.0, color: Colors.black),
    bodyMedium: GoogleFonts.openSans(fontSize: 14.0, color: Colors.grey),
  );
}

// AppBar 테마 설정
AppBarTheme appBarTheme() {
  return AppBarTheme(
    color: Colors.white,
    iconTheme: IconThemeData(color: Colors.black),
    titleTextStyle: GoogleFonts.openSans(fontSize: 16, fontWeight: FontWeight.bold, color: Colors.black),
  );
}

// ThemeData 설정
ThemeData mTheme() {
  return ThemeData(
    colorScheme: ColorScheme.fromSwatch(primarySwatch: Colors.orange),
    scaffoldBackgroundColor: Colors.white,
    textTheme: textTheme(),
    appBarTheme: appBarTheme(),
  );
}
앱의 진입점 설정
main.dart
import 'package:flutter/material.dart';
import 'theme.dart';
import 'screens/main_screen.dart';

void main() {
  runApp(CarrotMarketUI());
}

class CarrotMarketUI extends StatelessWidget {
  @override
  Widget build(BuildContext context) {
    return MaterialApp(
      title: 'Carrot Market',
      debugShowCheckedModeBanner: false,
      theme: mTheme(),
      home: MainScreen(),
    );
  }
}
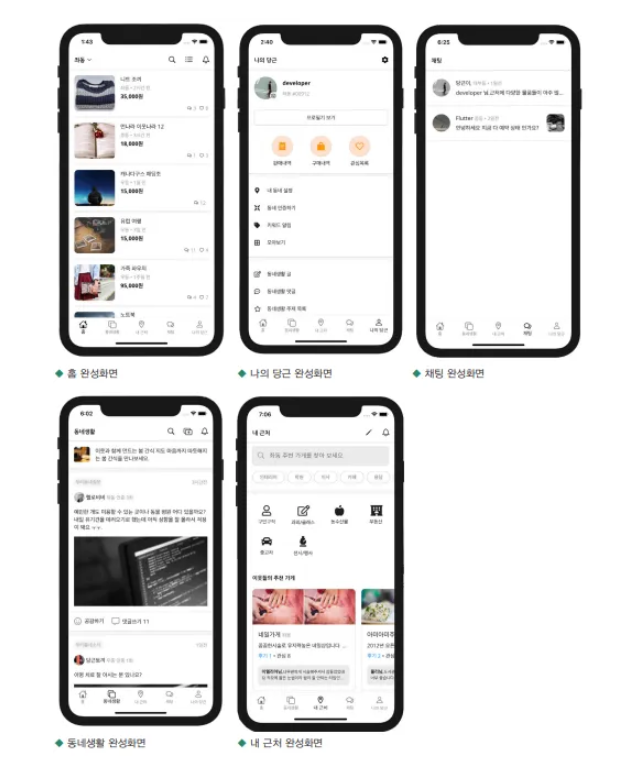
페이지 구성 및 상태 관리
MainScreen 생성
앱의 기본 구조와 페이지 간 이동을 위한 IndexedStack과 BottomNavigationBar를 설정합니다.
main_screen.dart
import 'package:flutter/material.dart';
import 'chatting_page.dart';
import 'home_page.dart';
import 'my_carrot_page.dart';
import 'near_me_page.dart';
import 'neighborhood_life_page.dart';

class MainScreen extends StatefulWidget {
  @override
  State<MainScreen> createState() => _MainScreenState();
}

class _MainScreenState extends State<MainScreen> {
  int _selectedIndex = 0;

  void _onItemTapped(int index) {
    setState(() {
      _selectedIndex = index;
    });
  }

  @override
  Widget build(BuildContext context) {
    return Scaffold(
      body: IndexedStack(
        index: _selectedIndex,
        children: [
          HomePage(),
          NeighborhoodLifePage(),
          NearMePage(),
          ChattingPage(),
          MyCarrotPage(),
        ],
      ),
      bottomNavigationBar: BottomNavigationBar(
        currentIndex: _selectedIndex,
        onTap: _onItemTapped,
        items: const [
          BottomNavigationBarItem(icon: Icon(Icons.home), label: '홈'),
          BottomNavigationBarItem(icon: Icon(Icons.people), label: '동네생활'),
          BottomNavigationBarItem(icon: Icon(Icons.location_on), label: '내 근처'),
          BottomNavigationBarItem(icon: Icon(Icons.chat), label: '채팅'),
          BottomNavigationBarItem(icon: Icon(Icons.person), label: '나의 당근'),
        ],
      ),
    );
  }
}
페이지 및 데이터 생성
샘플 데이터 모델 작성
Flutter에서는 데이터를 클래스 형태로 관리합니다.
models/product.dart
class Product {
  final String title;
  final String author;
  final String price;
  final String imageUrl;
  final int likes;

  Product({required this.title, required this.author, required this.price, required this.imageUrl, required this.likes});
}

// 샘플 데이터
final List<Product> productList = [
  Product(title: '니트 조끼', author: '유저1', price: '35,000원', imageUrl: 'https://example.com/image1.jpg', likes: 10),
  Product(title: '노트북', author: '유저2', price: '850,000원', imageUrl: 'https://example.com/image2.jpg', likes: 8),
];
홈 화면 구현
샘플 데이터를 활용해 리스트뷰를 구현합니다.
home_page.dart
import 'package:flutter/material.dart';
import '../models/product.dart';

class HomePage extends StatelessWidget {
  @override
  Widget build(BuildContext context) {
    return Scaffold(
      appBar: AppBar(title: Text('홈')),
      body: ListView.builder(
        itemCount: productList.length,
        itemBuilder: (context, index) {
          final product = productList[index];
          return ListTile(
            leading: Image.network(product.imageUrl, width: 50, height: 50, fit: BoxFit.cover),
            title: Text(product.title),
            subtitle: Text('${product.price} · 좋아요 ${product.likes}개'),
          );
        },
      ),
    );
  }
}
스타일링 및 컴포넌트 분리
컴포넌트화
중복 코드 관리를 위해 컴포넌트를 분리합니다.
image_container.dart
import 'package:flutter/material.dart';

class ImageContainer extends StatelessWidget {
  final String imageUrl;
  final double width;
  final double height;

  const ImageContainer({required this.imageUrl, required this.width, required this.height});

  @override
  Widget build(BuildContext context) {
    return ClipRRect(
      borderRadius: BorderRadius.circular(10.0),
      child: Image.network(imageUrl, width: width, height: height, fit: BoxFit.cover),
    );
  }
}
home_page.dart 수정
import 'package:flutter/material.dart';
import '../models/product.dart';
import '../components/image_container.dart';

class HomePage extends StatelessWidget {
  @override
  Widget build(BuildContext context) {
    return Scaffold(
      appBar: AppBar(title: Text('홈')),
      body: ListView.builder(
        itemCount: productList.length,
        itemBuilder: (context, index) {
          final product = productList[index];
          return ListTile(
            leading: ImageContainer(imageUrl: product.imageUrl, width: 50, height: 50),
            title: Text(product.title),
            subtitle: Text('${product.price} · 좋아요 ${product.likes}개'),
          );
        },
      ),
    );
  }
}
위젯 트리 (Widget Tree)
Flutter의 UI 구조는 트리 형태로 구성됩니다.
- 각 위젯은 부모-자식 관계로 연결됩니다.
- 상위 위젯(부모)은 하위 위젯(자식)을 포함합니다.
상태 관리 (State Management)
- State는 앱의 현재 상태를 의미합니다.
- 상태 변경 시 Flutter는 UI를 다시 빌드하여 화면에 반영합니다.
- 기본 상태 관리는 StatefulWidget과 setState로 구현됩니다.
(더 복잡한 경우 Provider, Riverpod 같은 패키지를 사용).
Material Design과 Cupertino
Flutter는 Material Design(안드로이드 스타일)과 Cupertino(iOS 스타일)를 모두 지원합니다.
- MaterialApp: Material Design 앱의 기본 구조.
- CupertinoApp: iOS 스타일 앱을 위한 구조.
기능 추가 및 최적화
- 상품 상세 페이지 연결
Navigator를 활용해 상세 페이지로 이동. - 다크 모드 지원
ThemeMode를 활용해 다크 테마 추가.